Introduction
Japanese Switch consoles (XAW, XKJ, XTJ) are unable to use higher 5GHz channels due to their WiFi chipsets being set to the JPN WiFI region in PRODINFO which restricts their use. You can manually change this region code to unlock the channels and use them in the USA or EU if you have an imported Japanese console.
This guide is meant for use with emuMMC, but it can be followed on sysMMC as well by mounting eMMC RAW GPP in Hekate to NxNandManager instead of the SD card's emuMMC. Be careful and keep PRODINFO backups if messing with PRODINFO on sysMMC.
Getting Started
We'll be using NxNandManager, and HxD to edit the PRODINFO. If you haven't dumped your console's prod.keys yet, you will also need to do that. Use your own console's prod.keys, this is important!
Downloads:
Preparations
- Download NxNandManager, and extract the zip file.
- Download and install HxD by running the setup.exe after extracting its zip.
If you haven't dumped your keys yet, I'll go over it quickly here. You can skip this if you have already dumped your console's keys.
- Download the latest release of
Lockpick_RCM.bin, linked above. - Place this file in
/bootloader/payloadson your SD card, and boot into Hekate. - Go to the
Console Infotab, and tap theLockpick RCMbutton. - Click the power button once in Lockpick to dump keys from sysMMC, then click power again, then highlight the option to power off and click power button once to confirm.
Dumping PRODINFO
We are now ready to go. First, we will dump the PRODINFO that needs editing:
- Take out the SD card from your Switch with emuMMC and insert it into your PC.
- Run
NxNandManager.exeon your PC and grant Admin when requested. - In NxNandManager, go to the
Optionstab and clickConfigure keyset - Click
Import Keys From File, and navigate to/switchon your SD card. Selectprod.keysand hitOpen. Then hit theSavebutton in the Configure keyset window. [Reference Picture] - Click
Filein NxNandManager, and selectOpen Drive - Select your emuMMC partition on your SD. (This will be about 29GB on V1 and V2 consoles, and about 59GB on OLED consoles.) [Reference Picture]
- Select
PRODINFOin the partition list. - Select the
Advanced Copybutton on the right pane. - Select Decrypt in the options, and set a file path to where you want to dump the file. (Any working directory you want to use is fine). [Reference Picture]
- Hit
Dumpto dump the decrypted PRODINFO to your PC.
![[Reference Picture]](https://lemmy.dbzer0.com/pictrs/image/15fb72a5-fc7e-4ca7-abfd-25dba79166ed.png)
![[Reference Picture]](https://lemmy.dbzer0.com/pictrs/image/8fa85f9e-1f09-4e50-9a89-00ec6f473c04.png)
![[Reference Picture]](https://lemmy.dbzer0.com/pictrs/image/df8c57bf-501e-42fa-a0be-963073ccb766.png)
Editing PRODINFO
- Run HxD on your PC, and open the dumped
PRODINFO.binfile. - In HxD, click on the
Searchtab and selectGo to. Input0080and hit OK. - Copy the North America WlanRegionCode data, provided below:
01 00 00 00 00 00 00 00 52 32 00 00 00 00 00 00 00 00 00 00 00 00 00 00 00 00 00 00 00 00 00 00 00 00 00 00 00 00 00 00 00 00 00 00 00 00 00 00 00 00 00 00 00 00 00 00 00 00 00 00 00 00 00 00 00 00 00 00 00 00 00 00 00 00 00 00 00 00 00 00 00 00 00 00 00 00 00 00 00 00 00 00 00 00 00 00 00 00 00 00 00 00 00 00 00 00 00 00 00 00 00 00 00 00 00 00 00 00 00 00 00 00 00 00 00 00 00 00 00 00 00 00 00 00 00 00 00 00 00 00 00 00 00 00 00 00 00 00 00 00 00 00 00 00 00 00 00 00 00 00 00 00 00 00 00 00 00 00 00 00 00 00 00 00 00 00 00 00 00 00 00 00 00 00 00 00 00 00 00 00 00 00 00 00 00 00 00 00 00 00 00 00 00 00 00 00 00 00 00 00 00 00 00 00 00 00 00 00 00 00 00 00 00 00 00 00 00 00 00 00 00 00 00 00 00 00 00 00 00 00 00 00 00 00 00 00 00 00 00 00 00 00 00 00 00 00 00 00 00 00 00 00 00 00 00 00 00 00 00 00 00 00 00 00 00 00 00 00 00 00 00 00 00 00 00 00 00 00 00 00 00 00 00 00 00 00 00 00 00 00 00 00 00 00 00 00 00 00 00 00 00 00 00 00 00 00 00 00 00 00 00 00 00 00 00 00 00 00 00 00 00 00 00 00 00 00 00 00 00 00 00 00 00 00 00 00 00 00 00 00 00 00 00 00 00 00 00 00 00 00 00 00 00 00 00 00 00 00 00 00 00 00 00 00 00 00 00 00 00 00 00 00 00 00 00 00 00 00 00 00 00 00 00 00 00 00 00 00 4E C4
- Go back to HxD, and highlight range 0080 through 020F in HxD. [Reference Picture]
- Right click on the highlighted range, and select
Paste write. [Reference Picture] - The data should be written to the selected range, and it should turn red to indicate unsaved data. [Reference Picture]
- At the top of HxD, select
Saveto save your PRODINFO changes, and then exit HxD.
![[Reference Picture]](https://lemmy.dbzer0.com/pictrs/image/d146fea7-6827-481c-b011-5710b5649da3.png)
![[Reference Picture]](https://lemmy.dbzer0.com/pictrs/image/4d82f50e-855e-4a79-86a1-eff6e765ff28.png)
![[Reference Picture]](https://lemmy.dbzer0.com/pictrs/image/b2bed0f7-b186-45b2-9e2b-4f10d725fd4f.png)
Restoring Modified PRODINFO
- Open NxNandManager on your PC again. Go to
File, and selectOpen File. - Open the
PRODINFO.binfile you just modified with HxD. Right click on PRODINFO in the left pane, and selectEncrypt & dump to file. [Reference Picture] - Select a folder (any folder you can find later) to dump the encrypted PRODINFO to, and hit OK. You should find a
PRODINFO.encin the folder you specified. - Select
Filein NxNandManager, and then selectClose file/drive. - Select the
Filetab again, and selectOpen Drive - Select your emuMMC partition on your SD.
- Select
PRODINFOin the partition list on the left pane. - On the right pane, select
Restore from file. Find yourPRODINFO.encfile, and open it. [Reference Picture] - Accept the prompt to write PRODINFO, then exit NxNandManager.
![[Reference Picture]](https://lemmy.dbzer0.com/pictrs/image/23332c82-036c-4886-9d04-96f500341d33.png)
![[Reference Picture]](https://lemmy.dbzer0.com/pictrs/image/d8686bfc-9893-4ce5-bfe0-7dfffc4835dc.png)
Finishing Up
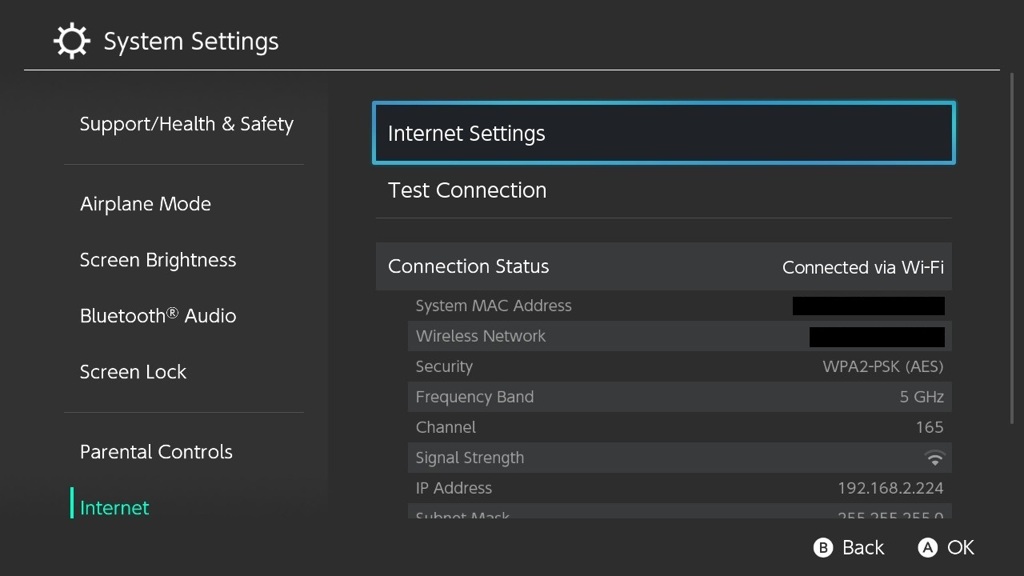
You should now have a USA WiFi region code in your emuMMC's PRODINFO, allowing you to use the same channels as USA Switches. Boot into Hekate, and launch emuMMC, then try connecting to any 5GHz network you weren't able to before.
For example, my 5Ghz network on Channel 165 now works fine:
Try searching for
rcm jigon Amazon.